Hiding Mailboxes and Addresses from the GAL
As
an Exchange administrator, you will create mailboxes that are designed
for a specific purpose but that are not intended to be used by internal
employees, such as a mailbox to receive notifications from your
antivirus software. Or, if an employee leaves the company, but her
mailbox needs to remain active for a period of time after her departure
in order to receive any important messages. In either of these
situations, it is unlikely that you would want to have the e-mail
address appear in the GAL. First, you don’t want internal users to
mistakenly send messages to those addresses. Second, the GAL can become
cluttered with these addresses and make it less efficient for users to
work with.
To deal with this
issue, Exchange Server 2003 allows you to hide recipient objects from
the GAL on an as-needed basis. To hide an object from the GAL, open the
Active Directory Users And Computers console and navigate to the desired
recipient object. Right-click it, and then click Properties. Click the
Exchange Advanced tab, shown in Figure 9.
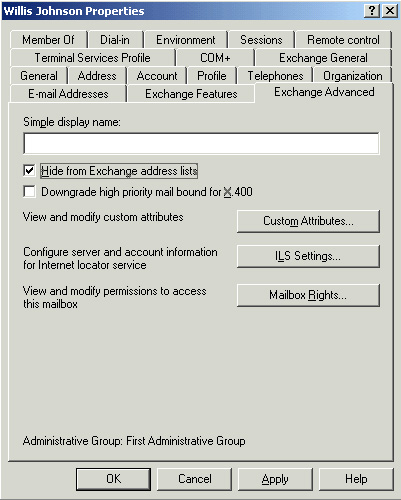
To hide a mailbox from
the GAL, select the option to Hide From Exchange Address Lists. This
will prevent the object from appearing in the GAL and other Exchange
address lists but will not prevent those objects from receiving e-mail
sent to them.
It
is often tempting to delete mailboxes for users who leave a company.
However, usually you will find that it is necessary to maintain an
employee’s e-mail account for a period of time, particularly when the
employee worked directly with customers and clients. By hiding the
mailbox rather than deleting it, you ensure that the mailbox will still
receive messages and can be accessed as necessary but won’t appear in
Exchange address lists. In addition, you will save yourself some work
when management requests to review the former employee’s mailbox a
couple of months after he left, and the Deleted Mailbox Retention period
has expired. A good practice is to hide the mailbox for 30 to 90 days
before deleting it, unless you’re specifically advised to keep it
longer. |
|
Modifying E-Mail Addresses
Occasionally, you will
need to change the e-mail address for a user or otherwise add an alias
for a user, for example, when an employee gets married and changes her
last name. In this situation, you want to create an alias so the user
can gradually migrate to the new address. For example, if the employee
Nicole Caron changes her name to Nicole Holliday, and her e-mail address
is [email protected], you can simply change her e-mail address to [email protected]
and she will receive e-mail at her new address. However, anyone who
tries to send e-mail to her at her previous address will receive a
non-delivery report (NDR). Therefore, the best option is to create a
second SMTP address for Nicole and set [email protected]
as the default. This approach will make the new address live and make
it the default reply address but still allow her to receive e-mail sent
to [email protected] with no additional configuration or action necessary.
To create an alias, perform the following steps:
1. | Open the Active Directory Users And Computers console and edit the properties of the target user account.
|
2. | Find and click the E-Mail Addresses tab. You will see the currently configured e-mail addresses for the user.
|
3. | Click New to open the New E-Mail Address dialog box, shown in Figure 10, which lists the types of new e-mail addresses that you can configure.
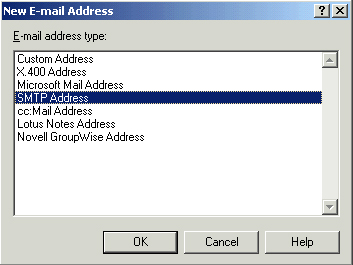
|
4. | Select SMTP Address and click OK. Then type the new e-mail address and click OK.
|
5. | As shown in Figure 11, there are now two SMTP addresses listed for the user. The address shown in bold is the primary address,
which means it will be the address that is used when e-mail is sent
using that interface (in this case SMTP). The address in regular type is
an alias (known as a secondary address),
which means the user will receive e-mail sent to that address but it
will not be the default address that recipients will see when e-mail is
sent.

|
If necessary, you can
have more than one secondary address, but only one address of each type
can be primary at any given time. For example, you may have three SMTP
addresses and two X.400 addresses, but only one SMTP address and one
X.400 address can be primary. To set the primary address, highlight the
address you want to make primary and click Set As Primary. You will see
the address become boldface and the previous primary address change from
bold to regular type.
Configuring Storage Limits
An
aspect of administering Exchange Server 2003 that tends to result in
tension between users and the administrator is storage limits. With the
general corporate emphasis on productivity and the amount of e-mail the
average user receives daily, more often than not mailboxes become full
of unnecessary items because users find it difficult to set aside time
to manage their mailboxes (or they haven’t been trained how to do so).
In a large organization, this can result in dramatically increased
backup and restore times. In small to medium-sized companies, mailbox
management could be the difference between being able to run Exchange
Server 2003, Standard Edition (which supports a maximum mailbox store
size of 16 gigabytes [GB]) and having to use the more expensive (albeit
more featured) Exchange Server 2003, Enterprise Edition.
There is
flexibility in configuring storage limits in Exchange Server 2003. You
can apply the same restrictions to the entire mailbox store or to
specific mailbox-enabled users. Likewise, you can override the global
settings configured at the store level for individuals that need to have
different limits. This is useful if you have a particular
mailbox-enabled user that regularly receives e-mail with file
attachments and you don’t want the same limitations imposed as on
standard mailboxes. There are three ways that you can configure storage
limits:
Individual mailbox
Individual mailbox store
Mailbox store policy